Affiliate links on Android Authority may earn us a commission.Learn more.
How to build your own digital assistant with a Raspberry Pi
July 11, 2025
As voice recognition and natural language parsing have improved so has the availability of digital personal assistants, fromBixbyto Alexa or Cortana toGoogle Assistant, all the major tech companies are continuing to develop digital assistants. Recently Google released its Assistant API for the Raspberry Pi. This means that makers, hobbyists and educationalists can now build the Google Assistant into project using the Pi.
Following the API release I started looking into building a kind ofAmazon EchoorGoogle Homeclone using the Raspberry Pi. Fortunately for me after a few days of pondering Google and the Raspberry Pi Foundation released the “Voice Kit” with a special bit of hardware called the Voice HAT (basically a speaker driver and microphone), plus some great software to built exactly that, a Google Home clone.

However, getting hold of the Voice Kit has been impossible. It was supplied on the cover of MagPi, the official Raspberry Pi magazine, and was sold out in hours. I hunted online and even asked one of my Android Authority colleagues (thanks Rob) to go out onto the streets of London to find a copy, but to no avail.
Thankfully all of the instructions for assembling the Voice Kit are online along with the software. So I decided to see how difficult it would be to get the Voice Kit up and running without the Voice HAT. The good news is that is isn’t that hard!

What you need
To build your own digital assistant you will need:
The basics
In a nutshell what we are going to do is take the Voice Kit software and modify it to work with the Pi’s internal sound card and a USB microphone. We are then going to make a switch (for activating the voice input) and put it all together in a cardboard box!
The first thing to do is download the Voice Kit microSD card image for the Raspberry Pi. You can download it directly fromGoogle’s AIY Project site. Once the .img.xz file has been downloaded you need to write it to the microSD card using a card writing utility. TheEtcher.iotool is a good choice for this as it is available for Windows, macOS and Linux. You don’t need to uncompress the image file, Etcher will take care of that for you.

When the microSD card is ready then you need to connect your Raspberry Pi 3 to a TV/monitor and hook up a mouse and keyboard. Once set up then boot your Raspberry Pi with the Voice Kit microSD card.
After booting you will see the standard Pixel desktop, however the background has been changed to feature the AIY Projects logo. There are a number of tasks that need doing and then you need to reboot.

From step 3 above the last few lines of /boot/config.txt should look like this:
The next step is to get the audio working. You are going to need a speaker with a 3.5 mm connector and a USB microphone. I didn’t have a dedicated USB microphone at hand so I plugged in a spare webcam that I had and the Pi was able to use the microphone from the webcam as a standalone mic! If you need a USB microphone then trythis one. Plug in the speaker into the 3.5 mm jack on the board and connect the USB microphone to one of the USB ports.
In the terminal type:
Delete all the contents of the file and replace it with:
Save the file and exit from leafpad. Theasounf.conffile tells the Pi about it sound hardware. As you can see there is a section for “mic” and another for “speaker”. The default values should be OK (but see below for troubleshooting).
Now it is time to reboot. Click on the Raspberry symbol (top left) and click on Shutdown… followed by Reboot.
When your Pi has rebooted it is time to run Google’s test scripts to make sure that everything is working.
Double click on the “Start dev terminal” icon again and type: leafpad /home/pi/voice-recognizer-raspi/checkpoints/check_audio.py
Near the top of the file change the lineVOICEHAT_ID = ‘googlevoicehat’toVOICEHAT_ID = ‘bcm2835’and save and exit.
On the desktop there are three files for checking your configuration, double click on “Check audio” and follow the on screen prompts. If you’re able to hear the sound being played and you are able to record your voice then you have the audio working.
If it doesn’t work then double check all the settings and read theConfigure and Test the Audiopage from Google’s Assistant documentation for more help and tips. In particular check out the section on using the “aplay -l” and “arecord -l” commands to check that your audio hardware is visible to the Pi.
In order for the Google Assistant to work your Pi needs to be configured to work with Google’s cloud services.Full details of how you do this can be found on the Voice Kit website, but here is a quick summary:
The switch
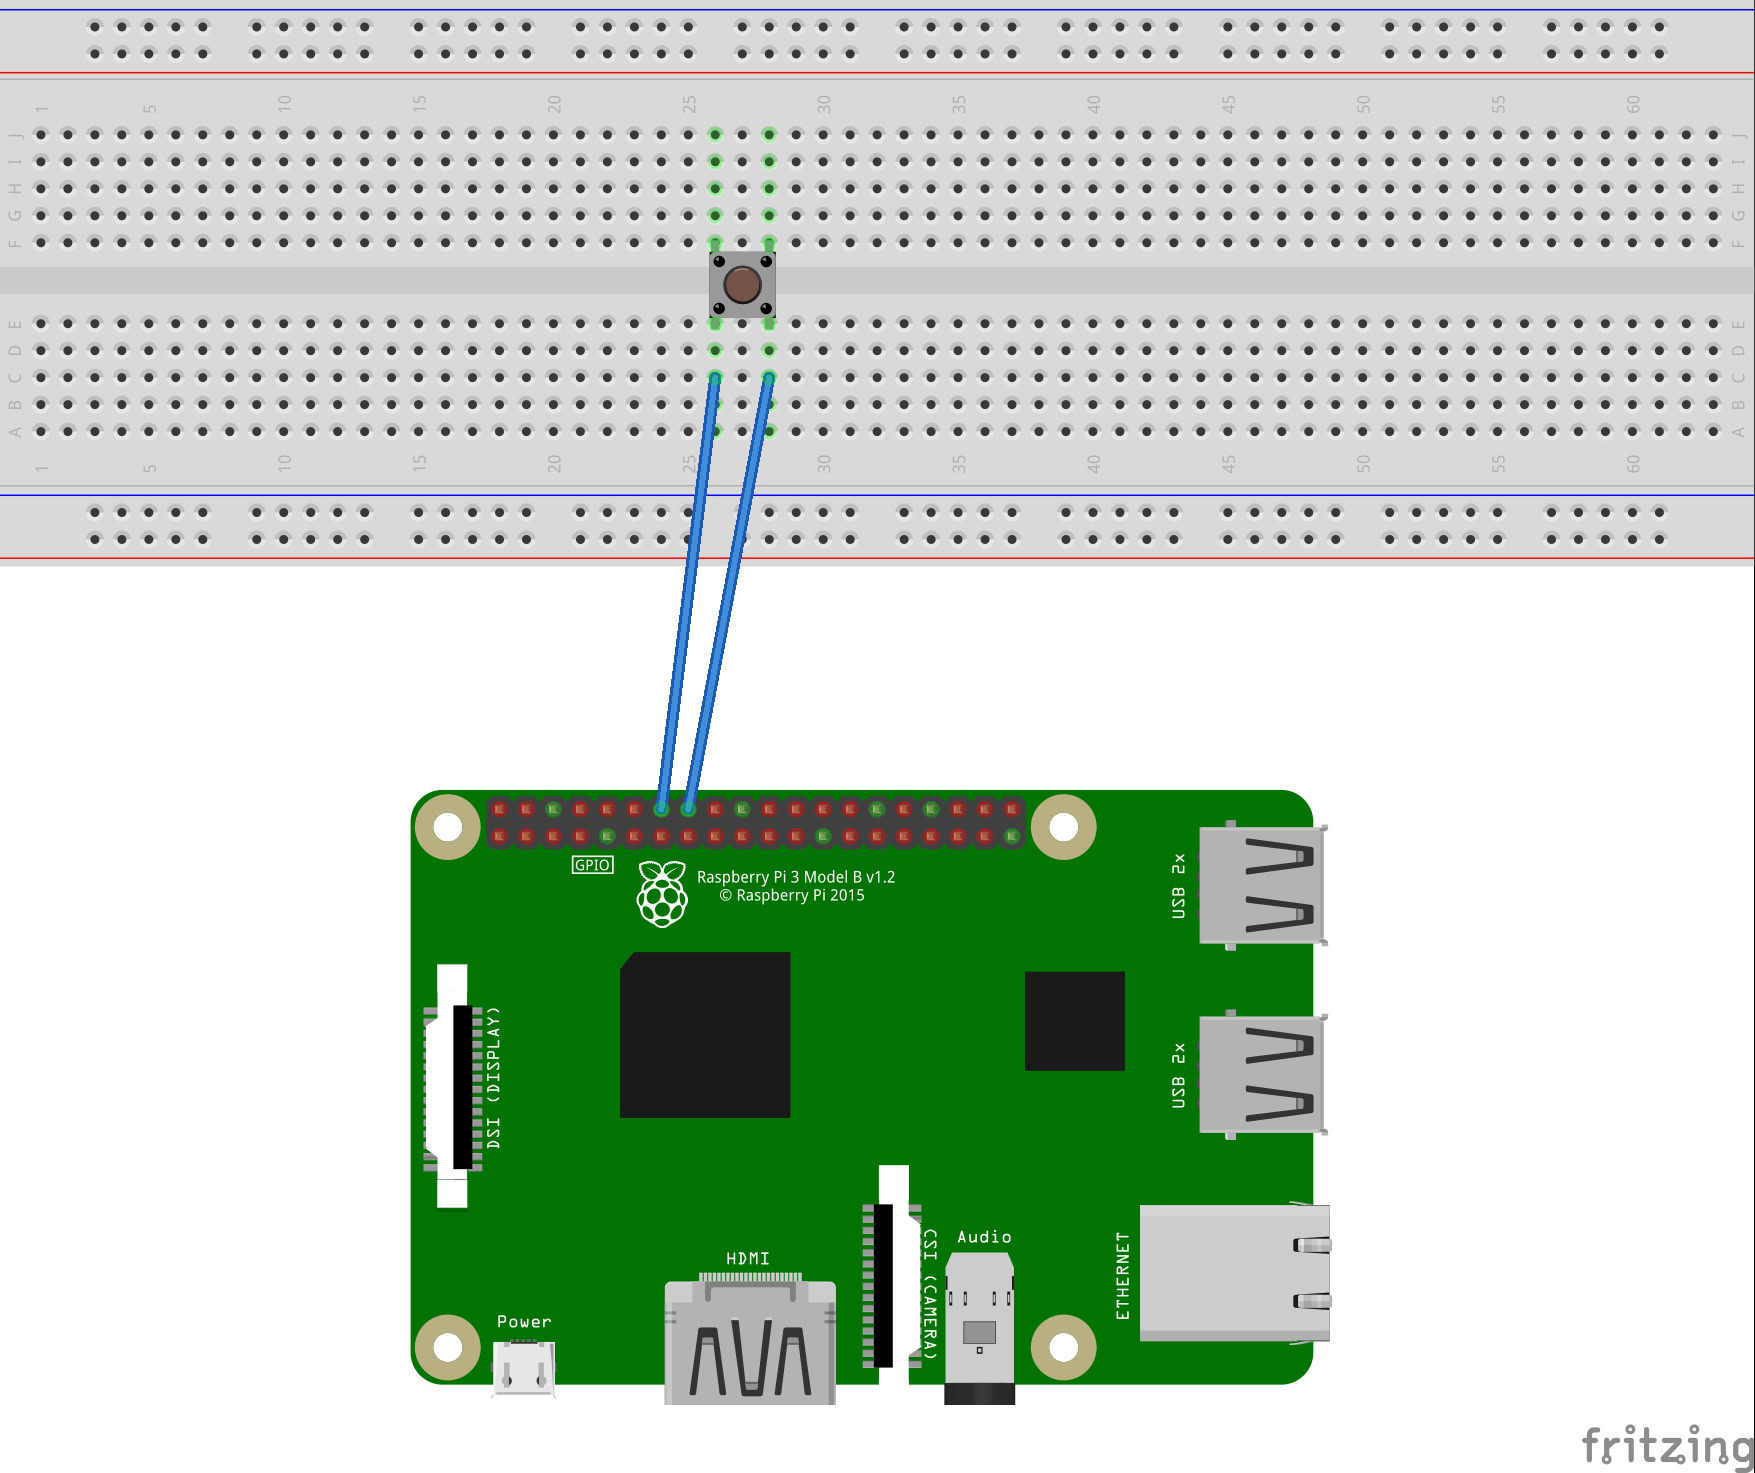
If you have the full Voice Kit from Google/MagPi then it comes with a big arcade switch that is used to activate the voice recognition. Since I don’t have the Voice Kit I decided to use my own switch. For simplicity I am using a breadboard and a simple push button switch:
The circuit for the switch is as follows:
Once you have your circuit built you need to connect one side of the switch to GPIO 23 and the other side to ground, which is conveniently located on the next pin to the left of GPIO 23.
If you may’t build the switch then even just briefly shorting GPIO 23 and ground will have the same effect!
You should now have everything you need to test Google Assistant on your Raspberry Pi. All you need to do is run the following command from the dev terminal:
Note: The first time you run main.py a web browser will open and you will need to login to Google to give permission for the Raspberry Pi to access the Google Assistant API.
Press the button (and let go, there is no need to hold it) and say something to Google. Try:
Making a case
The case that comes with the Voice Kit is simple in that it is made of cardboard, but yet sophisticated in that it has been designed specifically for the pieces supplied in the kit (like the speaker and the arcade button) and has an internal support structure.
For your home brew Google Assistant you will just need to use your imagination. Here is my best effort, but please remember that I was trained as a software engineer, not a hardware guy!
Once you have the basic Raspberry Pi based Google Assistant running then the next step is to customize it yourself. Google has lots of documentation about how you canextend the assistant using Google’s cloud services. There is even an example where you can you turn on and off an LED using your own custom voice commands.
If you build anything cool with Google Assistant and the Raspberry Pi please let us know in the comments below. I am also keen to see the cases you make for your contraptions!
Thank you for being part of our community. Read ourComment Policybefore posting.
