Affiliate links on Android Authority may earn us a commission.Learn more.
How to Root the Amazon Kindle Fire
July 24, 2025
Bring out a new Android device to market, and you can be sure that a method to root it will also come out very shortly after. That was what happened to the Amazon Kindle Fire. Thanks to the Android community of developers and enthusiasts, the Amazon Kindle Fire can be rooted–and fairly easily, too.
The rooting process for the Kindle Fire involves some command line typing, but not the complicated ones though. If you have tried installing a printer for your desktop, then this can be a similar thing. Read on to find out more about how to root your Amazon Kindle Fire.

Things You Need
Step-by-step Procedure
Step 1:Install the Android SDK into your PC. The details about how to install the software development kit will not be discussed here because it’s a totally different subject on its own.
Step 2:You now have to turn on “Allow Installation of Applications From Unknown Sources”. This can be done by tapping the Settings icon at the top right corner. Then, go to More->Device. You can turn on the setting from there.

Step 3:Connect the Kindle Fire to your PC using the micro USB to USB cable. If the connect screen comes up on the screen of the Kindle Fire, please do not tap on connect for this will enable USB connection.
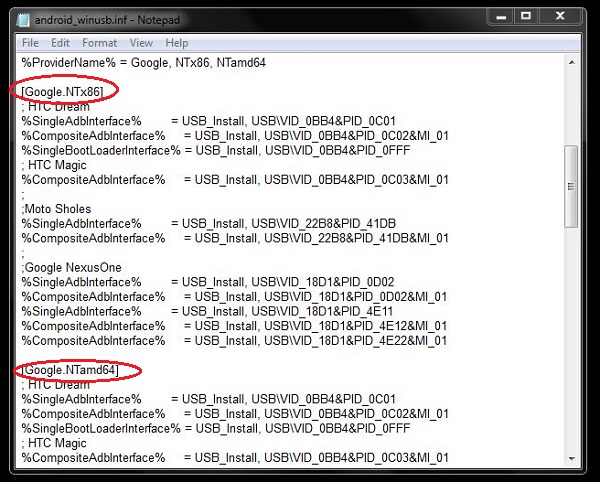
Step 4:Modifyandroid_winusb.inf

Step 5:Createadb_usb.iniand save it into the.androidfolder.
Step 6:Update the USB driver for the Kindle Fire.
Step 7:Check if Android SDK will now recognize the Kindle Fire.
Step 8:The last part of the process is to root the device. Since we already downloaded the software from Shortfuse, we just have to extract it. After extracting the software, you just have to run it and it will automatically do its charm.
Now that rooting is done, your Kindle Fire will now be open for endless possibilities. More third-party apps can now be installed on the device.
Thank you for being part of our community. Read ourComment Policybefore posting.

