Affiliate links on Android Authority may earn us a commission.Learn more.
Simplify asynchronous programming with Kotlin’s coroutines
July 08, 2025
Kotlin coroutines are still in the experimental phase, but they are quickly becoming one of the most popular features for developers that want to use asynchronous programming methods.
Most mobile apps have to perform long-running or intensive operations — such as network calls or database operations — at some point. At any one time, your app might be playing a video, buffering the next section of video, and monitoring the network for possible interruptions, all while staying responsive to user input.

Read Next:I want to develop Android Apps — What languages should I learn?
This kind ofmulti-taskingmight be standard behavior for Android apps, but it isn’t easy to implement. Android executes all its tasks by default on a single main UI thread, one task at a time. If this thread ever becomes blocked, your application is going to freeze, and may even crash.
If your application will ever be capable of performing one or more tasks in the background, you’ll have to deal with multiple threads. Typically, this involves creating a background thread, performing some work on this thread, and posting the results back to Android’s main UI thread. However, juggling multiple threads is a complex process that can quickly result in verbose code that’s difficult to understand and prone to errors. Creating a thread is also an expensive process.
Several solutions aim to simplify multi-threading on Android, such as theRxJava libraryandAsyncTask, providing ready-made worker threads. Even with the help of third party libraries and helper classes, multi-threading on Android is still a challenge.

Let’s take a look atcoroutines, an experimental feature of the Kotlin programming language that promises to take the pain out of asynchronous programming on Android. you may use coroutines to quickly and easily create threads, assign work to different threads, and perform long-running tasks on any thread (even Android’s main UI thread) without causing freezing or crashing your app.
Why should I use coroutines?
Learning any new technology takes time and effort, so before taking the plunge you’ll want to know what’s in it for you.
Despite still being classed as experimental, there’s several reasons why coroutines are one of Kotlin’s most talked-about features.
They’re a lightweight alternative to threads
Think of coroutines as a lightweight alternative to threads. You can run thousands of them without any noticeable performance issues. Here we’re launching 200,000 coroutines and telling them to print “Hello World”:
While the above code will run without any issues, spawning 200,000 threads will likely result in your application crashing with anOutOfMemoryerror.
Even though coroutines are commonly referred to as an alternative to threads, they don’t necessarily replace them entirely. Threads still exist in an app based on coroutines. The key difference is that a single thread can run many coroutines, which helps keep your app’s thread count under control.
Write your code sequentially, and let coroutines do the hard work!
Asynchronous code can quickly become complicated, but coroutines let you express the logic of your asynchronous code sequentially. Simply write your lines of code, one after the other, and thekotlinx-coroutines-corelibrary will figure out the asynchrony for you.
Using coroutines, you can write asynchronous code as simply as if it were sequentially executed — even when it’s performing dozens of operations in the background.
Avoid callback hell
Handling asynchronous code execution usually requires some form of callback. If you’re performing a network call you’d typically implement onSuccess and onFailure callbacks. As callbacks increase, your code becomes more complex and difficult to read. Many developers refer to that problem ascallback hell. Even if you’ve been dealing with asynchronous operations using the RxJava library, each RxJava call set usually ends with a few callbacks.
With coroutines you don’t have to provide a callback for long-running operations. this results in more compact and less error-prone code. Your code will also be easier to read and maintain, as you won’t have to follow a trail of callbacks to figure out what’s actually going on.
It’s flexible
Coroutines provide much more flexibility than plain reactive programming. They give you have the freedom to write your code in a sequential way when reactive programming isn’t required. You can also write your code in a reactive programming style, using Kotlin’s set of operators on collections.
Getting your project coroutine-ready
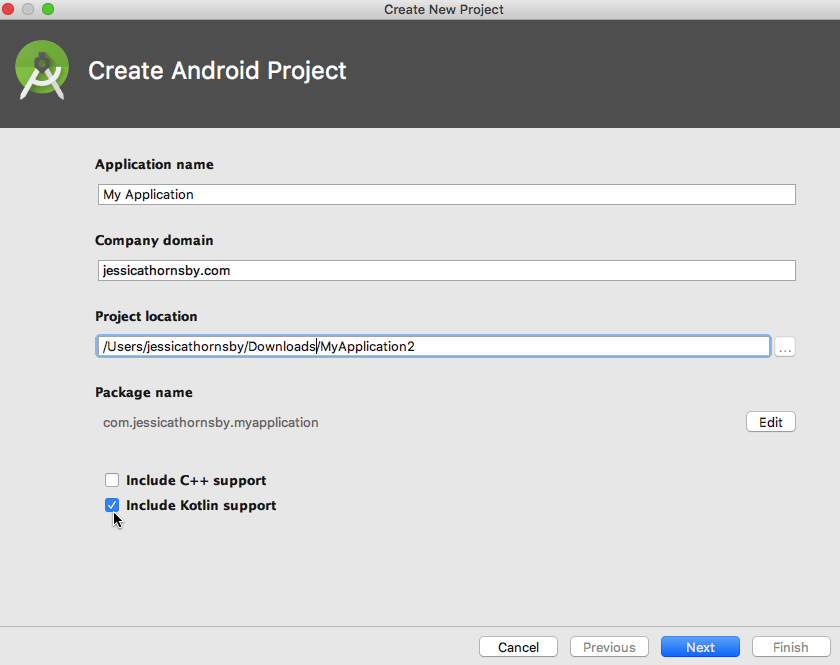
Android Studio 3.0 and higher comes bundled with the Kotlin plugin. To create a project that supports Kotlin, you simply need to select the “Include Kotlin support” checkbox in Android Studio’s project creation wizard.
This checkbox adds basic Kotlin support to your project, but since coroutines are currently stored in a separatekotlin.coroutines.experimentalpackage, you’ll need to add a few additional dependencies:
Once coroutines are no longer considered experimental, they’ll be relocated to thekotlin.coroutinespackage.
While coroutines still have experimental status, using any coroutine-related features will cause the Kotlin compiler to issue a warning. You can suppress this warning by opening your project’sgradle.propertiesfile and adding the following:
Creating your first coroutines
you’re able to create a coroutine using either of the following coroutine builders:
Thelaunch()function is one of the simplest ways to create a coroutine, so this is the method we’ll be using throughout this tutorial. Thelaunch()function creates a new coroutine and returns a Job object without an associated result value. Since you can’t return a value fromlaunch(), it’s roughly equivalent to creating a new thread with a Runnable object.
In the following code, we’re creating a coroutine, instructing it to delay for 10 seconds, and printing “Hello World” to Android Studio’s Logcat.
This gives you the following output:
Async()executes the code inside its block asynchronously, and returns a result viaDeferred, a non-blocking future that promises to provide a result later. You can get a Deferred’s result using theawait()function, which allows you to suspend the execution of the coroutine until the asynchronous operation completes.
Even if you callawait()on the main UI thread, it won’t freeze or crash your app because only the coroutine is suspended, not the whole thread (we’ll be exploring this more in the following section). Once the asynchronous operation insideasync()completes, the coroutine is resumed and can continue as normal.
Here,myMethod(result)is executed with the result of the asynchronous operation (the result returned by the block of code inside async) without having to implement any callbacks.
Replace thread blocking with coroutine suspension
Many long-running operations, such as network I/O, require the caller to block until they complete. When a thread is blocked it’s unable to do anything else, which can make your app feel sluggish. At worst it may even result in your application throwing an Application Not Responding (ANR) error.
Coroutines introduce suspension of a coroutine as an alternative to thread blocking. While a coroutine is suspended, the thread is free to continue doing other things. You could even suspend a coroutine on Android’s main UI thread without causing your UI to become unresponsive.
The catch is that you may only suspend a coroutine’s execution at special suspension points, which occur when you invoke a suspending function. A suspending function can only be called from coroutines and other suspending functions — if you attempt to call one from your “regular” code, you’ll encounter a compilation error.
Every coroutine must have at least one suspending function that you pass to the coroutine builder. For the sake of simplicity, throughout this article I’ll be usingDelay()as our suspending function, which intentionally delays the program’s execution for the specified amount of time, without blocking the thread.
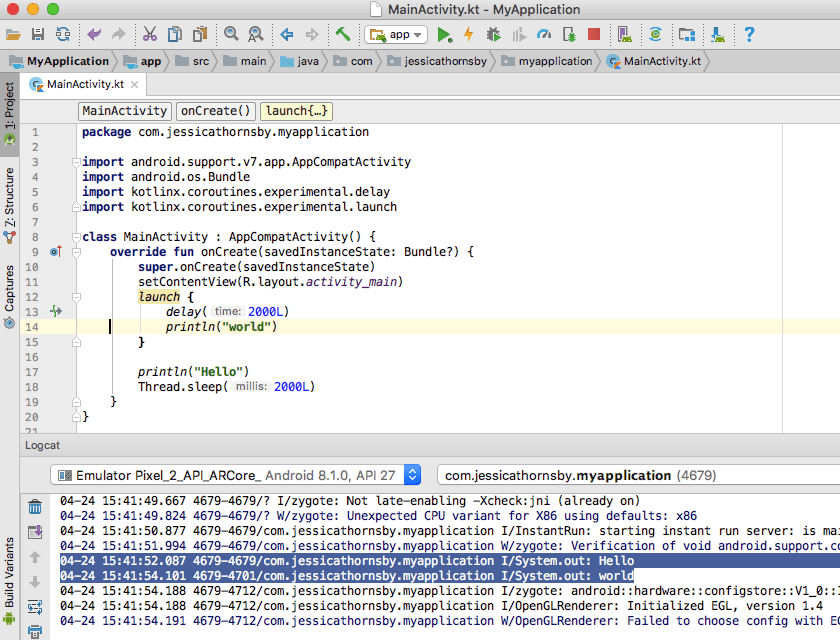
Let’s look at an example of how you can use theDelay()suspending function to print “Hello world” in a slightly different way. In the following code we’re usingDelay()to suspend the coroutine’s execution for two seconds, and then printing “World.” While the coroutine is suspended, the thread is free to continue executing the rest of our code.
The end result, is an app that prints “Hello” to Android Studio’s Logcat, waits two seconds, and then prints “world.”
In addition toDelay(), thekotlinx.coroutineslibrary defines a number of suspending functions that you can use in your projects.
Under the hood, a suspending function is simply a regular function that’s marked with the “suspend” modifier. In the following example, we’re creating asayWorldsuspending function:
Switching threads with coroutines
Apps based on coroutines still use threads, so you’ll want to specify which thread a coroutine should use for its execution.
You can restrict a coroutine to Android’s main UI thread, create a new thread, or dispatch a coroutine to a thread pool using coroutine context, a persistent set of objects you can attach to a coroutine. If you imagine coroutines as lightweight threads, then the coroutine context is like a collection of thread-local variables.
All coroutine builders accept aCoroutineDispatcherparameter, which lets you control the thread a coroutine should use for its execution. You can pass any of the followingCoroutineDispatcherimplementations to a coroutine builder.
CommonPool
TheCommonPoolcontext confines the coroutine to a separate thread, which is taken from a pool of shared background threads.
Run this app on an Android Virtual Device (AVD) or physical Android smartphone or tablet. Then look at Android Studio’s Logcat and you should see the following message:
I/System.out: Hello from thread ForkJoinPool.commonPool-worker-1
If you don’t specify aCoroutineDispatcher, the coroutine will useCommonPoolby default. To see this in action, remove theCommonPoolreference from your app:
Re-run this project, and Android Studio’s Logcat will display the exact same greeting:
Currently, if you want to execute a coroutine off the main thread you don’t have to specify the context, as coroutines run inCommonPoolby default. There’s always a chance default behavior may change, so you should still be explicit about where you want a coroutine to run.
newSingleThreadContext
ThenewSingleThreadContextfunction creates a thread where the coroutine will run:
If you usenewSingleThreadContext, make sure your app doesn’t consume unnecessary resources by releasing this thread as soon as it’s no longer needed.
You can only access Android’s view hierarchy from the main UI thread. Coroutines run onCommonPoolby default, but if you attempt to modify the UI from a coroutine running on one of these background threads, you’ll get a runtime error.
To run code on the main thread, you need to pass the “UI’”object to the coroutine builder. In the following code, we’re performing some work on a separate thread usinglaunch(CommonPool), and then callinglaunch()to trigger another coroutine, which will run on Android’s main UI thread.
Check Android Studio’s Logcat output, and you should see the following:
Cancelling a coroutine
Although coroutines have lots of positive to offer, memory leaks and crashes can still be a problem if you fail to stop long-running background tasks when the associated Activity or Fragment is stopped or destroyed. To cancel a coroutine, you need to call thecancel()method on the Job object returned from the coroutine builder(job.cancel). If you just want to cancel the acronymous operation inside a coroutine, you should callcancel()on the Deferred object instead.
Wrapping up
So that’s what you need to know to start using Kotlin’s coroutines in your Android projects. I showed you how to create a range of simple coroutines, specify the thread where each of these coroutines should execute, and how to suspend coroutines without blocking the thread.
Read More:
Do you think coroutines have the potential to make asynchronous programming in Android easier? Do you already have a tried-and-true method for giving your apps the ability to multi-task? Let us know in the comments below!
Thank you for being part of our community. Read ourComment Policybefore posting.
